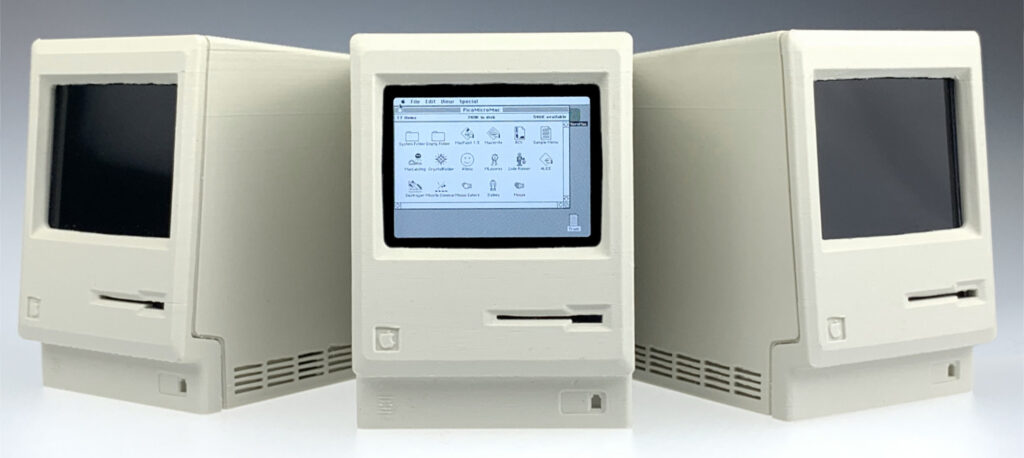
pico-mac-nano is a miniature, functional, scale replica of the original 1984 Apple Macintosh. It is 62mm high (no, that’s not a typo) and has basic USB keyboard and mouse support. Below is a journal of the journey but if you just want to see it in action, start building one yourself or buy any of the parts, here are all the links.
It all started with me stumbling across the crazy cheap Raspberry Pi Pico and taking my first foray into micro-controllers. Searching for what others had done with the Pico led me to pico-mac, a project by fellow Brit and super-clever-fella, Matt Evans. In a nutshell he created a stripped back emulator of the original Macintosh running Macintosh System 3 on a Pico with USB keyboard and mouse support and VGA out. This was no mean feat and took a lot of ingenuity (it’s a great read) due to the limitations of the Pico such as only having 264k of RAM.
The pico-mac project inspired me. To me it echoed the early days of computers like the first Macintosh when pioneers achieved remarkable things within the technological limitations of the day. Needless to say I set about building a pico-mac and am not ashamed (slightly ashamed) to say I giggled like a little girl when that black & white, 512 x 342 pixel Macintosh desktop appeared on my VGA monitor and I launched Lode Runner.


OK, but cool as it is, how much cooler would it be (I thought) if pico-mac could drive a small LCD panel in a miniature replica Macintosh case. Thus started my own quest to add LCD panel support and see how small I could make a working Macintosh using currently available, cheap components.
The LCD

The final size was always going to be determined by the LCD panel which had to display the 512px x 342px screen buffer. I eventually settled on the smallest 640x480px LCD I could find at a sensible price which was a 2″ TFT panel . Unfortunately it transpired it was technically 480x640px i.e. portrait. I assumed using in landscape would be trivial but I was wrong. The driver being used on the panel (the ST7701S) offers no image rotation function so the only option would be to rotate the frame buffer on the Pico. The problem was that the Pico was already being seriously overclocked to make pico-mac responsive so there just weren’t a lot of processor cycles to spare. RAM was tight too.
I looked at using one of the spare PIO state machines to rotate the frame buffer but I couldn’t find a way to make that work. In the end I took a step back and looked at a different approach. In its native portrait orientation, the LCD panel I had was 480px across. This was only 32px (1/16) less than the Macintosh screen width of 512px, which might be an acceptable compromise, so I tried getting the PIO that outputs the image data to drop every 16th pixel. This worked … sort of … but the result was unsatisfactory due to the common use if 1px wide vertical lines on the Mac interface such as window borders which would completely disappear at times. What I needed to do was make the emulator output a 480px wide image natively and this meant altering the Macintosh ROM file it uses.
I went about this all the wrong way but eventually managed it and compiled a version of umac (the emulator part of the pico-mac software) that outputs 480x342px … I was back in business. This compromise on resolution had a silver lining. Because I was now running the Mac screen across the full width of the LCD in portrait orientation, it meant the visible screen area was now smaller and that meant the Macintosh could be slightly smaller. It also solved the problem of having to factor in space for wide black margins on either side of the LCD which would have been necessary had I put a 512px wide image on a 640px wide LCD. It also meant the LCD flex cable was located at the bottom, not the side of the LCD so I would not have to bend it tightly.
Apart from an SPI interface to configure the LCD driver, the panel uses RGB565 (5 bits for the red and blue, and 6 for green) for the image data. That’s 16 data bits which was way more than I had available on the Pico. Fortunately, the original Macintosh had a black and white screen. It did not even support shades of grey. So I actually only needed to send one of two signals; all data bits high or all data bits low, and this could be done using the existing RGB data line provided for the pico-mac VGA out. I ran this past Matt but he said he didn’t think a single GPIO could drive that many inputs without using buffers so I began working on adding logic buffers to my PCB design.
In the end I didn’t need to because the backlight on the LCD panel is so bright, I found that only setting the most significant bit of each colour high still produced a bright enough image. Due to the asymmetry of RGB565, I found this gave a reddish tint but this disappeared if I drove the top two bits of each colour and gave me 50% more brightness. That is what I settled on and I have experienced no problems driving these 6 input lines from the same GPIO.


Actually getting the image to display on the LCD took me way longer than it should have but after hours of poring over the driver data sheet, adding code to the pico-mac source to configure the LCD panel via SPI, and playing around with the signal timings … result!
The Case

Now I had the final screen image size, I could work backwards to calculate the size of the Macintosh. Drum roll … (OK, I know I already told you) … 62mm high. But that assumed I could fit everything I needed inside a Macintosh case that small. The first issue was that using a standard Pico board was not practical; it was just too long. Fortunately, those clever people at WaveShare had produced a much smaller version called the Pico Zero at only a small price premium. That fitted nicely where the Macintosh logic board would have been with its USB-C port presented on the rear casing where the ports would have been … sweet!
I would probably have sacrificed inclusion of a micro-SD slot but fortuitously, there was just enough room to fit one next to the Pico Zero with its slot also where the Mac ports would have been. Ideally I would have liked to put the micro-SD slot behind the floppy disk drive slot but due to the orientation of the LCD panel, this was covered by the LCD so was not possible. Shame … but the primary goal was the smaller Macintosh.
One of the things I’ve enjoyed most about this project is all the new skills I’ve learned and things I’ve done for the first time. One purchase of a shiny new Bambu Lab A1, much help from my 3D modelling and 3D printing gurus (thanks Matt G & Spencer S), and a heap of failed prints and revisions later, I had a basic case.
The front panel has a slot for the LCD panel and a bracket to hold the internal components much as they are in the original Macintosh. I embossed the 1-bit rainbow logo on the inside of the rear case where the original Macintosh team’s signatures were. I created a separate click-in actuator piece that allows use of the reset and boot-select button on the Pico. The internal void was refined to minimise the amount of support material needed to 3D print.
The PCB
So I knew I could fit all the components in my 62mm high case, as long as I could connect them together. The problem was the sheer number of interconnections.

Time to learn about designing a printed circuit board and having it manufactured; more firsts for me. I 3D modelled and 3D printed a dummy of the PCB to the size and shape that would fit in the case and allow all the connections, and set about designing. To my surprise, the first prototypes worked!

By the time I got them, I had predictably already changed the PCB design to allow for possible options such as audio and battery power so there have already been several versions. As of writing, the latest was version 3.2.
The Extras
There are other details I implemented along the way. Micro-SD card support is implemented. See the pico-mac project documentation on Github for instructions on how to prepare an SD card with a bootable image on. Note that I opted to mount the micro-SD card reader upside down to align the slot with the USB-C port so cards must also be inserted upside down.
The pico-mac source code was amended to make use of the Pico Zero Neo-pixel RGB LED and this is used to show activity of different peripherals and to confirm that the emulator is running. It can be seen through the right hand side vents. If the LED stops flashing and the screen locks up, press the ‘R’ button on the base of the Mac briefly to reset. Holding down the ‘B’ button while connecting the pico-mac-nano to a USB port on your computer puts the Pico into boot select mode and it should appear as a mounted volume on your desktop. From here, new firmware files can be dragged to the Pico.

One of the idiosyncratic aspects of the original Macintosh were the black T15 bolts that were recessed so far into the handle recess that you needed a special extra-long tool to open the Mac up. I thought it would be fun to replicate this so I designed the front case to accommodate heat-insert, knurled brass M2 screw mounts allowing the case to be screwed together with tiny M2 1.5mm hex bolts.

Pico-mac makes use of the single USB port on the Pico (USB-C on the Pico Zero) for both power and to connect a USB keyboard and/or mouse. This requires the use of a special splitter cable (unless you are using the optional internal battery module) that provides a USB-A port for peripherals, and a USC-C for power. Unfortunately, many of these ‘OTG’ cables seem to include some form of hub circuitry that does not work in this configuration. I have tested quite a few types and these, along with all the parts in the pico-mac-nano, are available on the 1-bit rainbow web store.
The Options

The pico-mac-nano PCB was designed with the option to run from an internal battery so you can whip it out of your pocket (no sniggering at the back, Jenkins!) and wow your friends at parties. The design of the Battery Power Module is now complete and it is available here. It uses a non-rechargeable, 3.0v CR2 Lithium battery with a tiny voltage regulator to boost this up to the 5v required by the RP Pico. It incorporates a tine micro-switch operated by a rocker button that is presented on the rear case in place of the pop-out blank, and the whole unit plugs into a 2-pin connector on the pico-mac-nano PCB. It is compatible with all the pre-assembled pico-mac-nanos and PCBs we have supplied.
The Collectors Edition
ou_big")
I just couldn’t resist creating a matching, tiny version of the iconic ‘Picasso’ box that the original 128K Macintosh shipped in. After finally finding a manufacturer (in India!) and having the first batch back, I’m super-happy with the result; a white, full colour printed, corrugated cardboard box.
All well and good, but the Macintosh and accessories can’t just rattle around inside. It needed versions of the top and bottom polystyrene inserts the original Macintosh had. I settled on 3D printing them in white TPU which is flexible and so won’t scratch the Macintosh. To finish it off I added a 3D printed white plastic accessory case that sits next to the Macintosh in the box, just like the original. It’s big enough to fit the OTG cable and hex key.
Sadly, Apple has asked me to stop selling the pre-assembled Macs and the collectors edition box.
The Future
Well, I’m hoping for world peace and the criminalisation of nuts in brownies, but until then I’m working on an optional speaker module.
As of the time of writing, the UMAC emulator Matt Evans created for pico-mac does not support sound. Matt says he may add it at some point but in reality, sound was pretty primitive on the original Macintosh so it’s not a big loss. However, the absence of one sound did bother me and that was the beep when you turn the original Mac on. While I am not clever enough to add sound support to UMAC, adding code to output a beep as part of the pico-mac startup code seemed achievable. Having that simple beep when you turn it on adds another dimension of realism (for me, at least).
I looked at playing a sound sample of the actual Macintosh beep but given the lack of analog support on the Pico and the tiny speaker I would have to use, I opted to just play a tone of the correct frequency and duration (1 second at 600Hz if you’re interested). I didn’t want to add a digital to analog converter or an amplifier to the internal components and so opted for simply turning a GPIO on and off using a PIO state machine to generate a square wave. Using a small speaker, this gave a very quiet beep so I switched to using two GPIOs programmed to be the inverse of each other which gave a differential signal of twice the amplitude. This is now a reasonable volume and I’m currently experimenting with different low pass filter options to soften the ‘buzzy’ nature of a square wave, so watch this space.

The Caveats
Both pico-mac and pico-mac-nano were designed as fun proofs of concept, not as finished products. Pico-mac is an open source project with the single goal of seeing if an RP Pico could run a computer emulator. It is not guaranteed to run all early Macintosh software. It relies on a significantly overclocked RP2040 chip and the tolerance of any given Pico board to run at that speed may vary leading to stability issues.
Pico-mac-nano is also open source and simply builds on the pico-mac goal by creating the smallest functional scale replica. It uses reduced horizontal screen resolution so any software that was hard coded to assume 512px may behave unpredictably. The LCD is so small that for most people (certainly over-50s, sigh), it is not practical to actually use the Macintosh for any practical purpose.
If you chose to buy a fully assembled pico-mac-nano, you were paying for the components, materials and time taken to produce it. You are NOT paying for a ‘commercial product’ as the pico-mac and pico-mac-nano are open source, therefore no guarantees are offered.
All this is to say, if your pico-mac or pico-mac-nano is unstable or does not run the software you want, please don’t get upset with those that worked on it!
The Last Word
If you build or buy a pico-mac-nano, I hope you will have as much fun as I have had working on it (but hopefully less frustration!). I’d love to hear from you if you have any feedback, cool photos of your pico-mac-nano in interesting place, running great programs or 3D printed in cool colours. I’ll add the best to the Gallery. If you put together a custom boot image, send a copy so I can share the most interesting.
You can email me at pmn@1bitrainbow.com
One last shameless plug; if you are the owner or collector of ‘real’ vintage Apple computers, check out 1bitrainbow.com, a web store offering fully tested spare parts and accessories for Apple computers that are 25 years or older.
Hello Nick
I read an article on heise news, with a review of your great idea!
Thank you very much – also, I haven’t the time for such things, but I am very happy about your idea! I have in my cellar an orignal Mac PLUS with Apple Bag, also an Macintosh SE 😉
Great work and it’s worth my time to follow you and your project.
with kind regards
Stefan
Thanks Stefan. Glad you like it.
An amazing project!
I remembered my early years on DTP projects. Is there a chance to run something from QuarkXPress, Adobe Illustrator, Adobe Photoshop on this mac?
Hi Sergey, thanks for the interest and encouragement. I’m afraid there is zero chance of running such applications since the system only has 128k or RAM just like the original Macintosh. You can up it to 208K with a firmware change but even that’s not even close to what you would need. The Pico board it is running on only has a total of 264K or RAM! The pico-mac-nano was never intended to be used for real purposes. It is a proof of concept and novelty item.
Hello, is it possible to make a simple tutorial to upgrade the firmware to 208k in order to run MacPaint?
Hi, thanks for your question?
Changing the firmware requires re-compiling the pico-mac-nano source code and this process is covered in the original pico-mac project read me but I assume you don’t want to do that. I am happy to post a version of the compiled firmware on the GitHub page with the RAM set to 208K when I get a moment.
Thank you, keep us posted.
Just got mine the other day (plus the ones I bought as gifts for my ex-wife and my brother!) and It is so wonderful.
I was surprised to see that MacPaint would not run, since I certainly remember (though perhaps incorrectly) it running on my original 128k Mac in 1984. Is this because this is System 3.0 and MacPaint 1.3 and they required more RAM?
I would definitely be interested in firmware to allow MacPaint to run (even if it is then inauthentic)…
Hi Josh, It is my understanding (from the original pico-mac project documentation) that it is a memory issue and that the 208K build would allow it to run. I hope to test this myself soon and share a 208K firmware that can be flashed to your pico-mac-nano.
If you build a new disk image to support 208k, it would be awesome if you could throw on the original system 3.0 version of Dali Clock (which was originally distributed alongside Alice).
It appears it is available on this disk image:
https://archive.org/details/daliclock-mac128
Thanks for the suggestion. I’m looking forward to things calming down a bit so I can look at things like the 208K build.
Nick, I love your work and look forward to what you come up with!
For many years I maintained a series of early-generation Macs running DaliClock as bookshelf clocks.
It is the app I am most interested in having running on Pico-Mac, as silly as that is! (But a the moment I do not have the time available to dive into making it work myself.)
Hi Josh, I’ve finally had some time to play around with building bootable disk images for pico-mac, downloading software from that period, and getting it onto the disk image. Your enquiry about DaliClock prompted me to use it as a test. You can see it running here. Once I’ve got a few other bits of software running on it, I’ll upload the .img file to GitHub then you just need to download it and copy it on to an ExFAT formatted micro-SD card.
Nick,
Just now seeing your reply from Oct 22.
Thanks this is awesome!
So the intent would be to boot off the SD with a copy of the image? Is it also possible to reflash the internal boot drive?
Hi Josh. Yes, it’s possible to recompile the firmware with a revised built in boot image but you would not need to if you just want to run MacPaint as it’s already on there. Booting off the SD just allows you to save documents.
To add new software like DaliClock to the built in image would require the firmware being re-compiled.
Nick,
I got the image with Dali clock and it is working, thank you!
BUT… I tried to set the clock and discovered that the clock portion of the control panel does not appear to work. There is some sort of bug with how mousedown is being handled in the clock fields.
I have now (with Claude Code’s help) gotten Mac built on my desktop with a fresh set of downloaded roms and it is having he same problem. We thought it might be an issue with the screen size reduction to 480px wide, but we tested it in max with both that size and 512 and the bug was present in both.
Do you have any insight on the state of Mac and whether there is any hope of getting this resolved?
Nick,
BIG UPDATE: I have been working on and off with Claude Code for the last couple of months and we have now extended UMAC with a fully functional Real Time Clock chip implementation (Including as well the implementation of the PRAM) which we discovered was entirely missing from UMAC.
This was built on first-principles/clean-room based on documentation of the original RTC and information from the original editions of Inside MAC. We have set the desktop version to grab initialization time from the host, and the pico-mac version to start at January 24, 1984 at 9:00 AM since there is no clock on the host.
We should be releasing these extensions to the UMAC GitHub in the near future.
Can you message me off-blog to discuss a few points?
Bought mine 2 weeks ago. Can’t wait!!
Hi Nick,
I can’t wait for it!
Now you’ll have to make a larger version that uses the horizontal screen, even if it’s just a DIY version.
with kind regards
Absolutely fabulous and something only an Englishman could devote his time to. Congrats big time !
Ah, thanks!
Congrats on a job well done, Nick.
Looking forward to the Collector’s Edition being back on sale.
CONGRATULATIONS!!! I’m an engineer and attorney. The first computer I bought for my office was the Macintosh Plus because its Graphical User Interface (GUI) let me I quickly train a secretary to use it to type letters etc. I’m a retired 81 year old who is still fully licensed and give free legal advice to callers. I have not used the old computers I’ve stored, but have the software on floppy disks used with them. I was going to buy one assembled and in the box even though it is totally impractical, but you are sold out. Thanks for bringing back wonderful memories.
Thanks for your interest. Available to order again now.
Hi, really nice project, built with the “garage spirit” of Apple origins (unfortunately, that’s no more true!): I was drooling over the real one at my neighbor home when I was a teenager… But why making it so small (I’m 55, so the full size of the Coke can would have been fit my current near vision abilities!)?
:o)
I really appreciate your awsome work 🙂
Do you have any plan for open-sourcing battery power module?
Thanks for your interest. I may do at some point but it’s quite fiddly to build and solder, and as it takes a lithium battery, I don’t want to be responsible for any fires or melted Pico-mac-nanos!
Thank you for your reply 🙂
I have another question:
Your bom file does not have headers. Can you update this info?
I’m not sure what you mean by headers. There are column headings but these will be vendor specific so you might need to change them.
Sorry for the confusion!
I mean header sockets J3, J4, J6
Ah! I see. These were not included because I only had the PCB supplier putting the SMD components on and I was soldering the headers on. However, due to the huge number of orders, I am now ordering with the through hole components on as well so when I get a free moment, I’ll upload another version of all the POS and BOM files. People might still want SMD only so I will leave both sets.
Amazingly cool project. Will you have more pre-assembled at some point? Mailing list for those interested?
Thanks for your interest. You can order them now but there’s quite a long lead time.
John and I would love to have you on RetroMacCast to talk about pico-mac-nano and 1-bit rainbow. We stream live most Mondays but could work around your schedule/timezone.
Hi James, thanks for the interest and offer. I think that would be great. I’m away on holiday right now but can get back to you later in the week. You can email me at nick@1bitrainbow.com
Thanks
Sounds great drop me an email at info@1bitrainbow.com
Well in looking forward to getting mine! Ordered. Should be fun. It will go nice next to my g4 Cube. I owned the original as my 1st computer…. Thanks for this unique project, awesome. Counting the days!
fantastic,amazing ! i received mine. Happiness is in the box !
Congratulations for this amazing job !
I just ordered a pico-mac-nano, and I can’t tell you how much joy this absurd little machine brings me, even before it arrives. Because when I look at it, I’m right back here:
In the mid-1980s, I used to sneak into a computer store on South Lamar Boulevard in Austin, TX. I was just a kid, 11 or 12, hovering in a place that clearly wasn’t built for me. The store was ComputerCraft (though my memory insists it was “Computer Land”). Whatever the name, it was a temple.
There was reverence in the air. Grownups hovered around machines, speaking in hushed tones like parishioners admiring stained glass. I remember one guy breathlessly describing the graphics capabilities of the TI Professional Computer. He claimed he saw it render a Jaguar—maybe the car, maybe the animal—with such realism it looked like a photograph. His friend didn’t respond with quite enough awe, so he repeated the line with even more conviction. I still remember how badly I wanted to see that Jaguar for myself.
That conversation happened on the left side of the store, if memory serves. On the right was the Apple section—Apple IIs, early Macs. One of them looked like a Lisa, but it had a 3.5” drive, not 5.25s. I now realize it must have been a rebranded Macintosh XL. But I was a Commodore kid, so I didn’t linger.
The whole place had a strict “look but don’t touch” vibe for kids like me. I didn’t dare lay a finger on anything unless I had an adult with me. I might’ve been asked more than once to step away from a keyboard. So I walked the aisles with my hands behind my back, making it visibly obvious I was just there to observe. I came back often—sometimes with my parents, sometimes on my own, when I could get away with it.
Years later, in 1990, my family was finally ready to upgrade from our aging Commodore 64. We were eyeing a multimedia IBM-compatible system from a DAK catalog—CD-ROM, monitor, printer, software bundle, all for about $2,000. We ordered it. And waited. What arrived was a letter: backordered. Another letter. Another delay. Weeks turned into months.
Eventually, I convinced my dad to give up the ghost. “Let’s just buy one locally.” So we went back to that same ComputerCraft store on South Lamar.
This time, I wasn’t just a gawker. I sat at a PC-compatible, my dad standing behind me. With a parent present, no one shooed me away. We looked at a few options. I’d nearly made up my mind when something across the store caught my eye.
It wasn’t a PC. It wasn’t anApple II. It was a Mac Classic.
Tiny screen. Monochrome. A single-button mouse. No CD-ROM. On paper, it didn’t stand a chance against the beige PC towers. But when I sat down, I just knew it was the one. The pixel density. The startup smile. The calm, elegant interface. Where PCs booted in scrolling lines of code, the Mac just … smiled.
“This is the one I want,” I told my dad.
He looked at me like I’d lost it. “It looks like a toy,” he said. But I held my ground. And to his eternal credit, we walked out with that Mac Classic—and a StyleWriter printer.
I don’t think I slept for three days. I had no software except HyperCard, but that was enough. It wasn’t just a program—it was a universe. I spent days building stacks, experimenting, learning. Eventually, I bought a modem, packed up the Commodore, and never looked back.
Growing up in Austin, I didn’t realize it was a tech mecca. I thought every city had stores like ComputerCraft, where a kid could overhear adults whispering about CPU specs like they were state secrets.
But if it weren’t for places like that—places that tolerated a kid with nothing to spend but his curiosity—I might never have realized that technology could be beautiful. That machines could smile. That code could do magic.
And now, as I wait for this tiny Macintosh to show up from across the Atlantic, I realize: I’m still chasing that same feeling I had all those years ago. That sense of standing at the edge of the future.
Thank you for helping me find it again—even if only for a moment.
Wow Jason. What an amazing story; thanks for taking the effort to share it. I hope your pico-mac-nano does indeed rekindle that feeling, even if it’s through a magnifying glass ; )
Do send a photo once you’ve received it.
I, too, ordered one, and had use of a similar OG Mac working in an archaeology lab at SMC in Maryland in the 1980s. Whereas our local college had a shared lab with a few i386 IBM pcs running DOS (or whatever your floppy had), we had a GUI, a mouse, and eventually even a scanner. It was glorious. This project really takes me back, and I’m amazed that you’ve channeled it into this little genius machine. BRAVO! Great work!
Hi Nick, incredible what you did, for such a low price but with plenty of brain matter. I am amazed and wish I could have built something so cute. Or even thought it could be built ! Congratulations !!!
What you did is among the few things which makes me again believe in human ingenuity, when there are so many reasons to despair.
Hard to remember that when I bought my first Mac back in 1984 in France, it was the price of a (small) car…
Some thought I was crazy to spend so much for a “toy computer”. Back then “serious” people were supposed to work on IBM PC…
Evidently, that was much before Steve Jobs pushed Apple beyond 1 billion $, against all odds.
Thanks for the time machine…
Suggestion for a new related development : a 1/2” « pico-trackball mouse » for the pico-mac.
Suggestion for an addition to your shop : a 5X fresnel lens, similar to that one : https://www.amazon.fr/Loupe-lecture-pour-personnes/dp/B0DDBF4BJT (for too old Mac early adopters ;-).
Keep the good work !
Thanks for your kind words and enthusiasm. I’ll look into the magnifiers.
The Macintosh just arrived today. So lovely!
Thank you,
All the best from Germany,
Daniel
So glad you like it.
Can I somehow use my original 1984 floppy disks and programs and perhaps export some data that I have on them?
I’m afraid not. There is no support for connecting legacy hardware like a floppy disk drive. The pico-mac-nano is really not for any serious use. To access old disks you want something like a GreaseWeazle along with a full blown Macintosh emulator like Basilisk.
You can create your own boot disk with your chosen apps on a micro-SD card to boot the pico mac from but that won’t help you access your old disks.
Hello there,
I just read about your project and what Apple told you, not to.
This tiny Macintosh is really lovely and I just placed orders for 2 collector’s edition and I am so looking forward to receiving it.
Hey Nick,
today I received my Pico-Mac-Nano… From minute one I loved it 😅 i am not sure where I place it, but I have an seperate Unify Dongle and use it to connect my main keyboard and mouse to it… It works pretty well…
Nice to have would be an RTC Module in it… But I don’t know if Mac One had one in these times… But I remember to saw an analog clock on an old desktop in early 90th… I was born in 1982, so I have only simple remindings from the 80th…
Additional feature – maybe it is possible to get the LCD signal out to connect a VGA monitor 😬😅.
I will try to use a bootable image too… And let is on my desk as clock… But without RTC possibility it is hard to use… And even Network would be nice…
Is the emulator compatible to ESP32? I have so many ideas to use this gadget with more features… Maybe Social counter for yt or insta… Bitcoin Price Monitor 🫣 all that would be nice to have… Maybe it is possible to make a bigger one? Where the display is placed normal?
But you did a great job!
Thanks for the comments and I’m glad you loved it. I’ve thought a lot about ongoing development but I feel that making it bigger or adding extra outputs would deviate from the original point of the project. It is the fact that it is as small as I could make it which has made it most appealing, I think. If you want to make the case bigger you could easily use any of a number of Mac emulators running on a full Raspberry Pi. I think you could probably re-compile the original pico-mac C code for the ESP32 MCU.
Anyone get the git repo to produce a working firmware.uf2 file for this project with the 4D1F8172 rom image? Everything builds correctly after forcing DISP_WIDTH and DISP_HEIGHT since they are ignored by the top-level cmake file (adding add_compile_definitions(DISP_WIDTH=480) & add_compile_definitions(DISP_HEIGHT=342) corrects that) but the final uf2 simply shows a distorted desktop screen after loading.
I’ve also been on a journey to do a build – ultimately aiming for the elusive 208K mac.
First try was w/ default 128K build. Running into similar-sounding challenges.
Had the need to get DISP_WIDTH/HEIGHT defined. Thanks for the tip above. I was getting there myself and seeing your note confirmed. After that got a full build to complete. Well I did also hack around the SDL dependency in external/umac/src/unix_main.c so I could do the command-line ROM-patching step w/o that extra thing to chase down.
First test was just confirming my disc image was viable. Used “mini vMac” and some downloaded images from winworldpc.com (system 3.2, a combo MacPaint+MacWrite) and installed/copied onto an empty 800K image I made. Did the whole umac0.img thing copied to a micro SD card and that seemed to run fine. Note to others who missed a fine point (looks in mirror) – custom disc image can be done without any of the software build process. It’s a prerequisite of the software build (resulting in required umac-disc.h) but can be done totally independently to make umac0.img to run.
Anyway first test passed – ran great from the micro SD card. My process and picks from winworldpc.com seemed fine.
The second test was to take my firmware.uf2 that resulted from my full build and flash it onto the system. Reset w/ boot selector button pressed while USB connected directly to my mac, drag into the mounted volume resulting from all that.
That resulted in a failed boot. Disc w/ question mark off-center in screen. Distorted garble in bottom 5-10% of screen. Yeah something went badly wrong. Sounds maybe similar to your experience.
Luckily I could recover by taking firmware/firmware_3_2.uf2 from GitHub and repeating that flash step. Luckily it installed fine getting me back to the working shipping version.
Pic of screen running my build
https://share.icloud.com/photos/043s78ILHlx_azkA-xFdRIwNw
Side note – was happy to see that my first test with umac0.img on micro SD resulted in a read/write disc. I could save a MacWrite file, my window positions, etc survived a reboot.
As promised but good to see with my own eyes.
Unsurprisingly that test wasn’t able to get MacPaint running. That required the 208K mac and that required the firmware rebuild.
Got the umac unix_main building on my virtual Linux. It shows a different but still not good symptom there. Here’s a pic. There’s flickering in the mess at top every second or two.
https://share.icloud.com/photos/012hSde5DOwjxESpQGVDcMH2g
OK finally having some success. Did the umac unix_main build as “cd external/umac; make MEMSIZE=208” and had luck. Prior failed try specified no options (default WIDTH/HEIGHT/MEMSIZE) and had the messed up display as pictured above.
So this is just trying out on my virtual Linux (Centos 10 ARM64) on my mac. Next step is retrying the pico firmware build and flashing that to the tiny guy. That’s for another day.
As a bonus, since it was the 208K mac build, I tested MacPaint successfully.
https://share.icloud.com/photos/03c28G4WAKuLNbNMWBrbCAXDg
Built and flashed the firmware. No good. So I’m still stuck on making the mythical 208K firmware :-(.
My pico-mac-nano arrived yesterday. It is a delight.
I used a friend’s Macintosh’s MacPaint for some work diagrams in ’84 or ’85, though at the time all my programming was on mini-computers. But I have fond memories of playing with that early GUI and spent large chunks of my career building GUIs for apps on Sun workstations.
It seems a lovely coincidence that the pico-mac-nano is almost 1/6 the size—as your pictures with the Steve Jobs figure demonstrate. I am toying with the idea of buying a Barbie version of the Macintosh just to use the keyboard and mouse to complete the look.
Thank you for a very fun product!
Sue H
You are most welcome!
Got my collector’s edition last week in the states, just before the de minimus tariffs would have kicked in, and it’s wonderful! Might have to add the battery module after all but this project is by far one of the coolest things I’ve seen in some time – every person I’ve shown it to is quite impressed and taken with it!
Hi Jeff, So glad you like it and thanks for taking the time to message.
A question on the screw mounts, looking for the detailed part. I’ve printed the case – kudos on a nice clean print! The holes for screw mounts seem about 5mm deep and the existing screw mounts look about 3.5mm outer diameter. So does this look right for the knurled brass screw mount?
https://www.harfington.com/products/p-1146013?currency=USD&variant=42114219311353&utm_source=google&utm_medium=cpc&utm_campaign=Google%20Shopping&stkn=f8e35277684b&srsltid=AfmBOorWGMXibJUD5rvuyFDO7Md5RoQOgwVm0iflTa-smbQ6VJEJ679EgNI
I’m recreating the case. About 1 minute after assembling the full kit I knocked it on the floor and broke the case front. The superglue repair didn’t go especially well. And UK mail apparently isn’t working to US right now so no replacements seem on tap.. So I’m going the home build route for a replacement case.
Hi John,
Those should be OK although we only use 3mm long ones (length 3mm, M2 OD 3.5mm). They mustn’t stick out at all otherwise the case will not fully close. We left room behind so that there was room for any molten plastic that was pushed back. Shame about the case breaking. We are shipping to the US now if you need anything. We only had to stop for a couple of days while Royal Mail released their new duty paid service.
Thanks for the hint about needing that space. I finally got a chance to try my part and ran into a problem with… molten plastic partially filling the cavity and not allowing the screw all the way in. Debugging would have taken much longer without your note there. Thanks.
I was able to mitigate with a 1/16 inch ~ 1.6mm drill bit to remove some plastic and let the screw go all the way in. But of course better to start w/ a 3mm length part and avoid any trouble.
Maybe this will help someone else in the future doing their own case.
Omg, this thing is amazing! I just got mine, super fast shipping from UK to New York. In person, it is immensely charming. Add me to the list of people desperately waiting for the 208K of RAM tweak. 🙂 Thanks Nick!
-Dave
Hello,
First of all, congratulations on this crazy project!
I’m trying to create a umac0.img file with some games and utilities, but I have no idea how to do it or where to get the source files like lode-runner or missil, etc.
Could someone explain the procedure to me?
Thanks in advance 😉
Thanks. I use the mini vMac Macintosh Plus emulator to build disk images. I plan to produce a guide to doing this soon.
Agree it’s not immediately obvious how to create that img file. If you search back on my name I mention when the lightbulb went on for me.
No software rebuild needed, though that was my ultimate goal.
I also used mini vMac emulator. Downloaded some images from the mentioned website. Mount the img files with your games, etc by dragging into the emulator window. Mount a blank image to format and be the destination for software. Create the blank via the “dd” command as mentioned in one of the parent git projects — wasn’t it “dd if=/dev/zero of=myblankdisc.img bs=1024 count=800” for an 800K disc?
Are their plans to upgrade this project to the Waveshare Pico 2 Zero (RP2350-Zero) so we can have the 464K glory? The GPIO pinouts are a match with the RP2040-Zero you are currently using. The RP2350 has dual ARM M33 cores plus dual RISC-V Hazard3 cores. Makes me wonder with those RISC-V cores could be called upon to simulate the Mac 128K/512K audio while the M33 handles the rest with of the emulation that the M0+ is handling in your current model.
Thanks for your interest. I know that pico-mac has been run successfully on a Pico 2 and I believe it just needs to be re-compiled for that target. I would very much like to produce firmware for pico-mac-nano to use the Pico 2 Zero but so far I have just not had the time.
In terms of adding sound support, it’s not something I think I could do. I did not write the pico-mac code, that was Matt Evans. I made some code changes but adding a core function to the emulator is a bit beyond me. However, I believe AdaFruit have added basic sound support to pico-mac and when I get the time, I hope to replicate their code changes to the pico-mac-nano code. Matt has also mentioned adding sound support so that may happen at some point.
Hi,
I just received my Pico-Mac and its delightful!
Unfortunately at my age, I really cannot see the display, it’s so small! – Currently having to view it via the magnifier app on my iPhone 🙂
Despite this, it’s such a cool little beastie, I love it.
Thanks Steve
Pingback: MacRumors 2025 Holiday Gift Guide - GLOBAL NEWS 24H
Thanks for the amazing product. I enjoyed tinkering with the firmware and managed to modify it to a pixel doubled 240×180! It is even more useless in the sense that most apps don’t fit in the screen but at least now you do not need a magnifier!
A. Short
Well done! Fun, isn’t it.
Nick, thanks for making this. I just got a chance to start assembling mine, and there are parts I’m not sure what to do with. Is there an assembly guide somewhere? I looked around but didn’t see one, though that just means I could have missed it. Thanks.
I also mentioned this project in a comment on Hacker News, I hope it drive some business.
Tom.
Hi Tom. Glad you got it OK. There is an assembly guide YouTube video here : https://youtu.be/FugBVLUHsEs?si=NNhA7MHeAY37PCsp
Thanks
Nick
That was just what I needed! Thanks!